Printing
Student Printing
If you are an undergraduate student, you may print at one of the many library and residence hall locations.
Departmental Printing
Departmental printing is done through our (black and white) Xerox copiers and a color printer in the mail/copy room in the main office. All documents you print will count towards your copier page total.
Obtain a Copier ID
You will need to have a copier User ID created for you before you can use the copiers. If you already have a code for making copies and scanning to email, you can reuse this for printing. Please see the the front office manager in 367 for this.
From the Web
Copiers
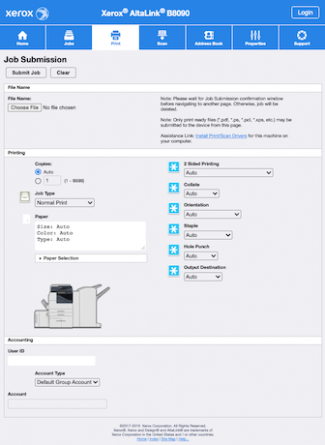
The Xerox AltaLink B8200 copiers have web interfaces where you can upload your document to print. Your file will need to converted to a print ready file format such as PDF or PostScript. All Macs have built-in print-to-PDF capability. Visit either copier's web page linked below, upload your document, set your print job's parameters, enter your copier account credentials, then click Submit Job at the top.
Color Printer
The Xerox VersaLink C8000 color printer can receive documents to print in the same manner as the copiers, but the login process is slightly different. Click "Log In" at the top right of the printer's web page. Find your name under "User Accounts", then enter your copier code in the "Password Required" field when prompted. Then click "Submit File" at the bottom of the page to upload your document.
From a non-departmental computer
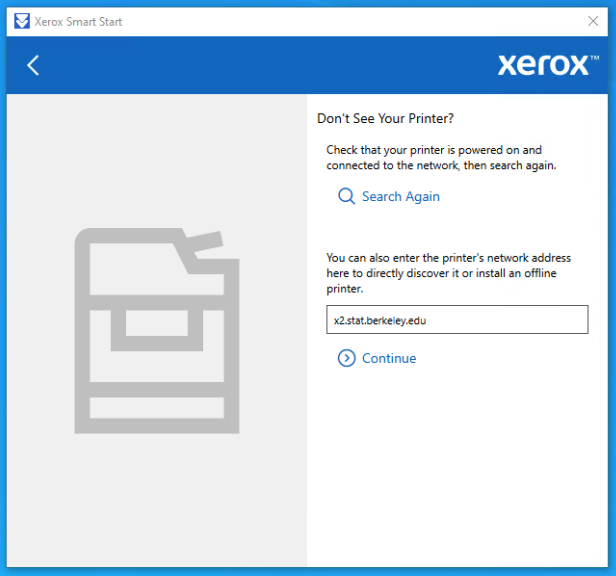
If you want to print to the copiers from your personal computer by using the native print capability, you will need to download and install Xerox drivers, then create a print queue. On Windows, download the Xerox Smart Start application.
When installing the driver, the installer may try to automatically find the Xerox copiers on the network and install the print queue for you. You can click on a button, usually the right-most of three large square buttons, to specify one of the Xeroxes above.
If the driver installer did not create the queue, you will need to do this manually. On a Mac visit System Preferences > Print & Fax to add a printer. Choose one of the printer addresses, and set the Protocol to "HP Jetdirect - Socket" and leave the Queue field blank. Specify the B8200 driver you just installed.

When printing this way, make sure you are on campus ethernet or are on eduroam. Printing from CalVisitor will not work.
The Mac may respond with, "Unable to verify the printer on your network," which is fine.
On a Windows computer, if the app doesn't discover the copiers, click "Don't See Your Printer?" and enter the network address manually -- one of x1.stat.berkeley.edu or x2.stat.berkeley.edu.
Once you have added the queue, you will need to configure it with your copier ID.
You will need navigate to where you can enter your ID.
macOS
If this process does not work for you for whatever reason, you can upload your document to the Xerox web pages linked above.
- Choose the desired Xerox copier from the standard print dialog window, e.g. File > Print, when you first need to print.
- Go to the Print Options section (in might be Layout in some macOS versions) and select Xerox Features.
Image
-
In the dialog box that pops up, choose Advanced.
Image
-
Then click the Accounting... button. In the new window, set Accounting System to Xerox Standard Accounting. Set Default User ID to your copier user ID. Leave Default Account Type as "Default Group Account". If you have multiple codes, you can enable Print Time Prompt to have it prompt you for each print job. Here are the accounting settings:
Image
-
If you want your code to be saved, go back to the main print dialog window and choose Presets > "Save Currents Settings as Preset...". This needs to be done immediately after entering them into the accounting window.
Windows
- Open the Printers and Faxes, or Devices and Printers window.
- Click on the printer, and then "Open printer app".
- Click on the "Device Settings" button on the right.
- Click "Print Queue Settings" on the left, then Accounting.
- Under Default User ID, enter your copy code.
macOS
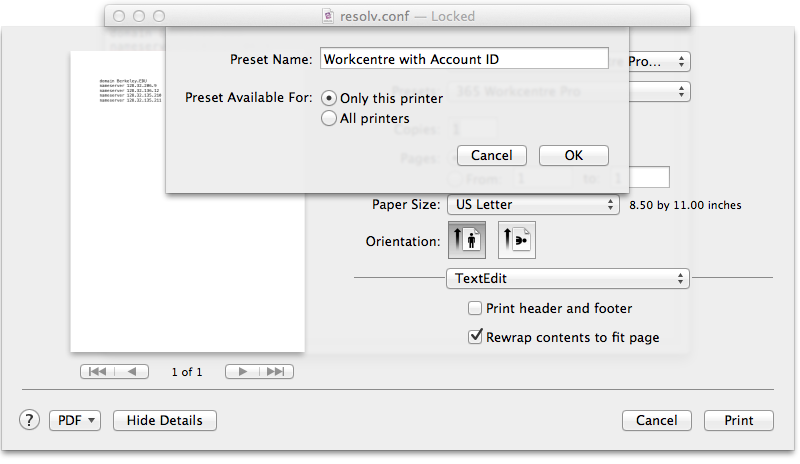
- Click the pop-up menu next to Presets.
- Choose Save Current Settings as Preset....
- In the dialog window that pops up, assign a name to the Preset such as "Xerox with Account ID". Next to Preset Available For choose Only this printer.
- Click OK. Whenever you want to print without having to enter your User and Account IDs, just make sure to select the preset in the Presets pop-up menu.
Troubleshooting
- If the Xeroxes accept your job but do not want to print it, and cite resource constraints with any or all of the paper trays, your document might not be formatted for 8.5"x11" paper. On macOS in Preview, you can see the size of the document under Tools > Show Inspector. You can often reformat your document to an acceptable print size by printing it to PDF. You can then upload that PDF to the copiers.